wp-Monalisa ist the WordPress plugin that smiles at you like Monalisa does. wp-Monalisa lets you add your own smilies to posts, pages and comments, simple and with just one click or by using shortcodes.
This documentation refers to wp-Monalisa version 2.1. The plugin ist tested up to WordPress Version 2.9.1. It works with all modern browsers like Firefox, Opera and Safari and also with Internet Explorer Version 6, 7 and 8.
Content:
1. Settings
2. Updating wp-Monalisa
3. Importing smilie packages
4. Managing smilies
5. Changing the smilies‘ layout
6. Changing smilies‘ position
7. Support and support
1. Settings
After installing and activating the plugin you see a new menu item wp-Monalisa in your admin menu. Here you can change the settings, add and delete smilies and change the order of your smilies:
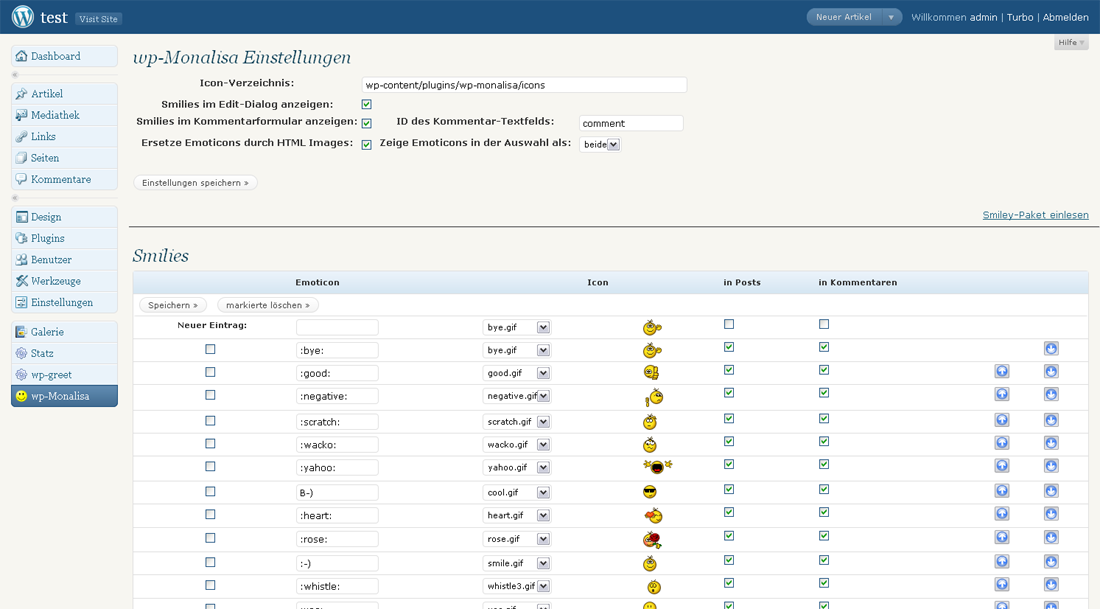
The default smilie directory is wp-content/plugins/wp-monalisa/icons, you find several preinstalled smilies in this directory. You can upload as many smilies as you like into this directory using FTP. Alternatively you can use another directory within your WordPress installation by changing the path under Iconpath. For instance if you are already storing your smilies in a directory named „my-smilies“ in „wp-content“, you change the iconpath to „wp-content/my-smilies“, then click „Save Settings“ and please read the message that appears and click „OK“ once again. To save your changes definitely, click „Save Changes“ once again.
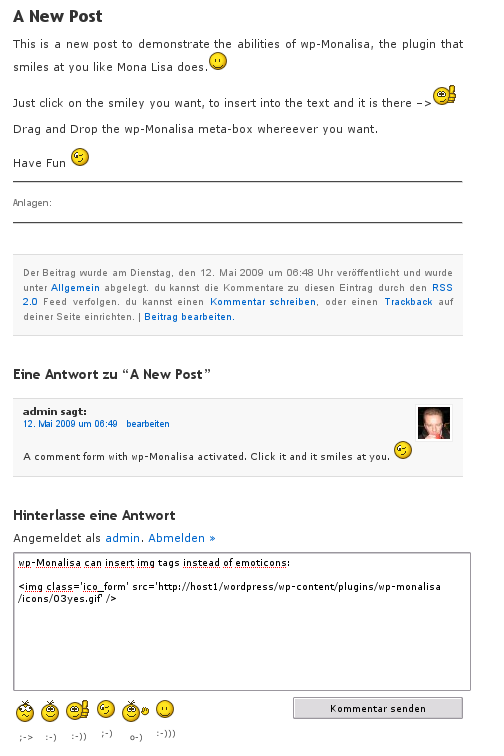
Check Show smilies on edit if you want to use your smilies when you write posts and pages. A new box (whose position can simply be changed by dragging and dropping) containig your smilies will appear beside or under your writing section, and you can insert smilies just by clicking them:

Check Show smilies on comment if you want to let your commentators use smilies in their comments, too, just by clicking them:
wp-Monalisa can be added automatically to your comments form, if your comments.php contains the line <?php do_action(‚comment_form‘, $post->ID); ?> The default ID of the comments field is „comment“. If you are using a theme that has a different name for the ID of the comments field you have to indicate this name under Comment Textarea ID.
If you don’t want your smilies to show up automatically under the comments field but rather have them appear somewhere else, turn off the checkmark under Show smilies on comment and add to your comments.php the line <?php if(function_exists(wpml_comment)) { wpml_comment(); } ?> wherever you would like your smilies to appear.
Check Replace emoticons with html-images if you don’t want the shortcode like : – ) to appear in your sourcecode but the image path like <img class=“wpml_ico“ src=“http://your-site.com/wp-content/plugins/wp-monalisa/icons/smile.gif“ alt=““ />. Pro: If you should ever uninstall the plugin the smilie will still be in your text or in the comment (but why should you uninstall the plugin ![]() ). Con: The sourcecode gets a bit confusing when you and/or your commentors use many smilies.
). Con: The sourcecode gets a bit confusing when you and/or your commentors use many smilies.
Under Show emoticons in selection as you can choose if your smilies in the admin area and under the comments show up as icons (Icon), or just as a shortcode (Text) or with icon and shortcode (Both).
Check Show smilies in a table if you want to have your smilies displayed in a table. This might be useful if you have smilies of very different sizes. Displaying them not in a table might cause overlapping them. Under Smilies per row you can indicate how many smilies are to appear in one row.
Checking Show smilies as pulldown, then only the number of smilies in Smilies in 1st row are shown by default. additionally a „more…“-link is displayed showing the rest of your smilies. This option is meant to present the smilies well-arranged.
As expected Show tooltip for icons activates a tooltip for each icon, showing the emoticon when hovering over it.
When BuddyPress is installed at your site an additional option is shown: Show Smilies in BuddyPress. If you check this option, wp-monalisa integrates itself with BuddyPress for Acitivies, Messages, Groups) and the bbPress forums. The option Replace emoticons with html-images can not be used with BuddyPress, because this will lead to problems in BuddyPress.
There are two specifics with BuddyPress: Since BuddyPress adds new activities using local javascript, it is not possible to show the smilies directly after you enter a new activity. The smilies will be shown after the first reload. The standard sidebar of BuddyPress showing notices has no filter to hook in at the moment. Therefore smilies are not displayed there. To avoid this there are two workarounds: Use the Activity-Stream-Widget for BuddyPress or edit the file bb-messages-template.php and change line 546 (version 1.5.7) to
<?php echo apply_filters('bp_get_message_notice_text', stripslashes( wp_filter_kses( $notice---->message) )) ?>2. Updating wp-Monalisa
wp-Monalisa can be updated manually, by deleting all files in the directory wp-monalisa and uploading the new files, or automatically within the plugins management section of your WordPress blog. In either case you should deactivate and reactivate the plugin after updating, because otherwise possible changes in the database are not accomplished.
If you were using a version older than 0.9 before updating and have made changes to the file wp-monalisa.css, you should make a copy of this file before updating and upload the file afterwards. From version 1.0 this file will no longer be overwritten any more when updating. (See also 5. Changing the smilies‘ layout)
3. Importing smilie packages
Since version 0.2 wp-Monalisa supports importing phpbb-smilie-packages. You can download different smilie packages at www.greensmilies.com with up to 3600 smilies.

To import a new smilie package proceed the following steps:
- Download the smilie package (.zip-file)
- Unpack it into a directory on your server (e.g. wp-content/smilies)
- Make sure that the .pak-file and the smilies are in this directory as well. The .pak-file contains the assignment of emoticon to smilie-image, the label if it is active or not, and an indication of size and a description (the last two are not yet being used by wp-Monalisa at present)
- If necessary, adjust the iconpath
- Start the import process by clicking the link „Import Smiley-Package“
- Choose your desired .pak-file in the dropdown list
- If you want the currently active smilies to be deleted before the new package is imported, check the box „Delete current smilies before import“
- Start importing the smilies by clicking „Start import“
- The results of the import and/or error messages will show up in the log-area
- After having imported your smilies you can close the window by clicking „Close“
To create your own .pak-file you can use any texteditor or a table calculation program (like oo-calc). The format of the .pak-file is CSV (=Character Separated Value). If you use a table calculation program make sure to save your data via CSV-export and then change the file enxtension from .csv to .pak.
The default.pak enclosed to wp-Monalisa looks like this:
 'bye.gif', 29, 24, 1, 'Bye', ':bye:'
 'good.gif', 26, 23, 1, 'Good', ':good:'
 'negative.gif', 29, 28, 1, 'Negative', ':negative:'
 'scratch.gif', 27, 24, 1, 'Scratch', ':scratch:'
 'wacko.gif', 20, 24, 1, 'Wacko', ':wacko:'
 'yahoo.gif', 42, 27, 1, 'Yahoo', ':yahoo:'
 'cool.gif', 21, 21, 1, 'Cool', 'B-)'
 'heart.gif', 28, 25, 1, 'Heart', ':heart:'
 'rose.gif', 30, 26, 1, 'Rose', ':rose:'
 'smile.gif', 20, 24, 1, 'Smile', ':-)'
 'whistle3.gif', 26, 25, 1, 'Whistle', ':whistle:'
 'yes.gif', 20, 20, 1, 'Yes', ':yes:'
 'cry.gif', 31, 22, 1, 'Cry', ':cry:'
 'mail.gif', 36, 26, 1, 'Mail', ':mail:'
 'sad.gif', 20, 24, 1, 'Sad', ':-('
 'unsure.gif', 32, 20, 1, 'Unsure', ':unsure:'
 'wink.gif', 20, 20, 1, 'Wink', ';-)'
The line group has to look like this:
Column 1: Filename
Column 2: Width
Column 3: Height
Column 4: Active yes=1/no=0
Column 5: Description
Column 6: Emoticon / Shortcode
If you want to use a ‚ in a column you have to escape it with \ (e.g. :\’\-( ).
4. Managing smilies
In the lower part of wp-Monalisa’s administration you can manage your smilies. After the installation all enclosed smilies are listed here and attached with a shortcode. After adding a new smilie to your smilies directory you have to enter a shortcode for it in the field under „Emoticon“, then choose the new smilie from the dropdown list and check the boxes under „On Post“ and „On Comment“, if you want this smilie to appear in posts and/or coments. Finally save your settings by clicking „Save »“. Now your new smilie appears at the bottom of the smilies list. You can sort your smilies by moving them up- and downwards using the arrows beside the smilies. Don’t forget to click „Save »“ when you have finished sorting them.
To delete a smilie from the list, mark the checkbox beside it and click „Delete marked »“. (This doesn’t delete it from your webspace but just from the list.
Since version 0.9 smilies that are not yet mapped (i.e. that have no shortcode yet) are marked with a star *, so you can see with one view which ones are mapped and which ones not.
One thing to keep in mind using wp-Monalisa:
If you have marked the box beside „Convert emoticons like : – ) and : – P to graphics on display“ in your WordPress settings under Settings -> Writing ->, the original WordPress smilies for these shortcodes will be used instead of your own smilies. If you don’t want this to happen, remove the checkmark in the checkbox.
5. Changing the smilies‘ layout
The plugin directory wp-monalisa also contains the file wp-monalisa.css. In this file you can make changes to affect the appearance of your smilies and the shortcodes:
div.wpml_commentbox has effect on the smilie container under the commentform. You can for instance make a border around it by changing „0px“ to „1px“ (or higher) beside „border“.
div.wpml_commentbox_text is mostly for developping purposes, there is no need to make changes here as they won’t affect anything.
div#wpml_metabox is for the smilie container in the edit section, beside or beneath the writing area.
div.wpml_ico_both This refers to your plugin settings under „Show emoticons in selection as“, if you have chosen „both“. You can change the value for:
– „font-size“ to change the font size of the shortcodes,
– „border“ to draw a border around every smilie and shortcode
– „padding“ to change the spacing between the smilies
– „height“ to change the horizontal space between the smilies if they are displayed in several rows. If you use a smilie package that contains very big smilies, „height“ should have at least the value of your biggest smilie.
div.wpml_ico_icon works similar to div.wpml_ico_both, if you have chosen „Icon“ under „Show emoticons in selection as“.
div.wpml_ico_text works similar to div.wpml_ico_both and div.wpml_ico_icon, if you have chosen „Text“ under „Show emoticons in selection as“.
img.wpml_ico affects the appearance of the <img>-tags. You can for instance change the size of your smilies by changing „height“, or define a background colour for the smilies.
6. Changing smilies‘ position
From version 3.0.0 on wordpress offers the possibility to design the comment form more flexible. Usiong the function comment_form you an influence the design and layout of the comment form in various ways. wp-monalisa supports this offering the function get_wpml_comment() starting with wp-monalisa v1.4.
E.g. to place the smilies between the textarea and the submit button you can use it in the follwoing way:
$args = array(
	'comment_notes_after'  => get_wpml_comment(),
	'comment_notes_before' => 'The Smilies are below.',
);
comment_form($args);
Usually you have to edit the file comments.php of the corresponding theme. If you use the function with the comment_notes_before paramteter you can place the smilies above the textarea.
7. Support and support
If you have any questions or problems you send a suport request via the wp-monalisa admin-dialog.
You can enter a description and have to give your email address. The default is the blog email address.
Additionally some information about your installation can be send with the request, making the analysis easier. If the checkbox is active this information will be send together with your request. The informations that will be sent is shown at the bottom of the dialog.
If you want to support the development of wp-monalisa you find a Donation-PayPal-Link at the top of the admin-dialog. Jut click it. ![]()
Also ‚comment_notes_before‘ is only visible for not logged in users
Hello Tob,
thanks for your hints. I fixed this above.
The codeview about changing smilies position might be confusing. it’s obviously „=>“ not „>“ right?
Pingback: Smilies go BuddyPress, bbPress with wp-monalisa « tuxlogger – WordPress and more…
Pingback: >Tuxlog